
The Modgen programming environment
When installed on a computer, Modgen integrates itself into the (required) Microsoft Visual Studio C++ environment. The visual components of Modgen are a separate toolbar as well as additional items under the Tools and Help menus of Visual Studio. Modgen also appears as an option in the file dialog box for creating a new project as well as in the dialog box for adding a file to an existing project.
Figure 1 displays a screenshot of the programming interface as it appears after opening the Modgen application 'RiskPaths.sln'. The Modgen toolbar consists of several icons for running Modgen, accessing help, opening the BioBrowser tool, and switching the language (between English and French).
Figure 1: The programming interface
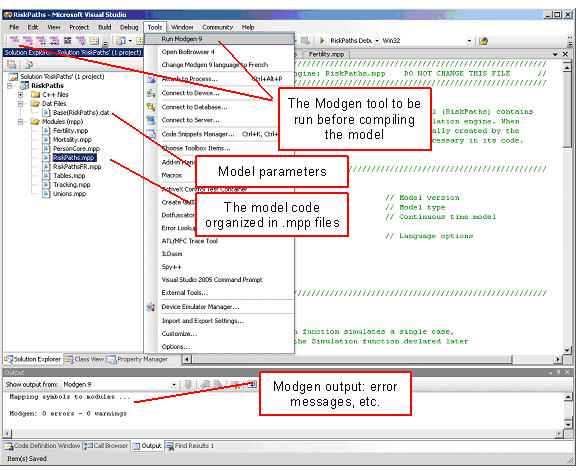
Modgen code is organized into several files, each with the file extension .mpp. As can be seen in the Solution Explorer window (Figure 1), RiskPaths consists of eight .mpp files grouped in the "Models (mpp)" folder. These are the essential files of RiskPaths, i.e. the files containing all Modgen code written by the model developer.
When invoking the Modgen tool (which can be accessed from the toolbar, or from the first item under the "Tools" menu), these .mpp files are translated into C++ code. Thus Modgen acts as a pre-compiler, creating one .cpp source code file for each .mpp file and putting the resulting .cpp files in the "C++ Files" folder. The Modgen tool also adds model-independent C++ code components to the "C++ Files" folder; these additional filesFootnote 1 should not be changed by the model developer and are essential in order to use the C++ compiler to build the Modgen application.
The model parameters are contained in one or more .dat files organized in a folder labelled "Scenarios". These files are loaded at runtime and contain the actual values assigned to the parameters.
When running the Modgen tool, Modgen - like the C++ compiler - produces log output that is displayed in the Output window. Any error messages are also displayed in this window, and clicking on a particular error message leads you directly to the corresponding Modgen code that produced the error.
Two steps are required to create a Modgen application from the Visual Studio environment. First, Modgen has to translate the Modgen code in the .mpp files; this is done when invoking the Modgen tool. Second, the resulting C++ application has to be built and started. This can be done in one step by selecting "Start Debugging" in the "Debug" menu or by clicking the corresponding icon on the toolbar.
Notes
Footnotes
- Footnote 1
-
ACTORS.CPP, ACTORS.H, app.ico, model.h, model.RC, PARSE.INF, TABINIT.CPP, TABINT.H.
- Date modified: